Monday, July 7, 2008

I took a break because I broke.

Photobucket


ok.
So I had an "incident" at the beach that left me laying on my back for a while.
And, turns out , this time when I say "incident" and "laying on my back for a while,"
I don't mean it in a good way.

but.
Im back and unbroken now, and I have got all kinds of hot baked love lined up for you.
check me out next monday and I swear we will be back on track.
Don't leave me.
This has been tough enough as it is.

Monday, June 30, 2008

Rosemary Skewered Shrimp from The Mayor

Photobucket

Just in time for fourth of July grilling comes a recipe straight from the very woman who taught me how to light my hand on fire with out getting burnt.
(seriously...kind of like this)
If that won't give you grill cred I don't know what will.
A real wonder woman, The Mayor is both my big brother and my little mama.
When she isn't "kissing hands and shaking babies" on the beat , she's generally walking around scorching the pavement with her white hot sex appeal, running a painting company , and stopping every so often to make sweet love to a Cuban sandwich.
P.S. those aren't euphemism's.

This one is super simple and deliciously delicious, lending itself to an infinite number of variations.
The Mayor suggests melting a little butter with hot sauce as a marinade and using some BBQ sauce for grilling.
You could also marinate it with garlic / white white, slather it with a citrusy BBQ sauce or simply serve it over a bowl of rice or a salad.
Either way it cooks up in a snap with minimal preparation.
The Perfect appetizer for hungry BBQ guests awaiting the goods.

When marinading, remember to use shelled shrimp as the marinade will not penetrate the shell.

If you plan to use this as a main , count on about 1/2 a pound feeding one person.

Keep in mind the rosemary will catch fire if your cooking over an open flame.
It looks cool and smells great but obviously presents a challenge to the safety and well being of those around you.

Minimize risk by submerging the rosemary in a water bath before grill time, blowing out the flames (happy birthday !) or stamping them with the end of your tongs.
Another option is to skip the whole fire hazard thing entirely and use a
grill pan.

This "recipe" is a little amorphous on the proportions , but the way you build it is pretty straightforward.
You should have an equal number of all the ingredients in a 1:1 ratio.
(one rosemary to one shrimp to one tomato to one piece of bacon...)

If you have shrimpy shrimp feel free to double up two small ones on one rosemary sprig.

You can also stretch out your tomatoes and bacon by slicing each in half.


Rosemary skewered Shrimp with bacon and cherry tomatoes


  • Shrimp that has been shelled and de-veined. we started with a bag of about 25.
  • Rosemary springs
  • Cherry tomatoes
  • Bacon


Start by stripping the Rosemary.
This sprig is going to act as the "backbone" of the appetizer.
Depending on the size of your shrimp you are going to want to strip off about 2 inches of leaves.
It is better to err on the side of too few.
You want to be sure your stem is both long enough and bare enough to accommodate your shrimp, a slice of bacon and a tomato.
Choose woodier rosemary about 4-5 inches in length.
The woodier stem will be less floppy and easier to control on the grill.

Start by poking the rosemary stem through one end of a piece of bacon.
Thread on the shrimp , then the other end of the bacon so that it covers one side of the shrimp like a meaty half moon ribbon.
Last, punctuate the stem with a cherry tomato finial at the bottom.

If you are finding it difficult to use the rosemary as a skewer, use an actual skewer, chop-stick or knife to make holes in the shrimp etc. first.
The rosemary will thread through more easily.

Keep in mind shrimp does not have to be cooked over a ridiculously high heat.
Let's go with a medium flame, otherwise you could save yourself a lot of time and just skewer some charcoal brickets and call it a day.
Ya heard?

The small shrimp took roughly a minute and a half on each side.
Larger shrimp about 2-3 minutes each side.

Shrimp are great to cook on the grill because they tell you when they are done.
Raw shrimp are often ocean colors like blue or slate gray
and change to sunset colors when cooked - pink or orange.

Monday, June 23, 2008

Mulberry Jam

Photobucket
Here we go round the mulberry bush....

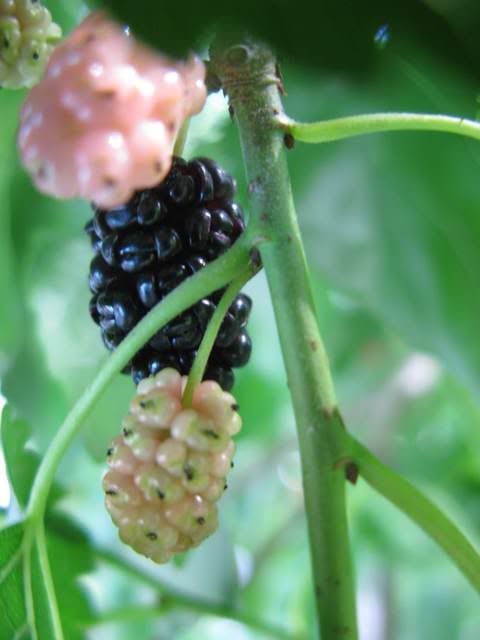
Every year there is a generous tree that reaches over my parents fence with heavy drooping branches of succulent mulberries.
Taught with sweet juice and ready to burst, they await picking like anxious little water bombs perfect for canning.
And every year I brazenly climb a ladder, wave at my stunned neighbor and try to apease my fathers threats to chop off the branches with a jar of something sweet.
Mulberries have a gentle blackberry-like flavor and unapologetically stain nearly everything they touch which accounts for his itchy axe arm.
The more precocious berries, too impatient to be picked, drop faster than a wireless call tagging the concrete below with purple black graffitti.

The last person I gifted with a jar of mulberry jam looked at me with polite distrust - sort of like I just stepped off a mississippi raft in dirty jeans and a straw hat asking them to whitewarsh a fence. I think she was expecting something more common and benign, like straight up strawberry.
But, gentle reader, I am here to tell you that mulberries don't reside in some kind of archaic Appalachian berry otherworld rubbing elbows with huckleberries and boysenberries.
They are actually fairly prolific, ripening across the delaware valley as we speak, and probably staring up at you from right under your nose.
(eew.)
Once you know how to recognize a tree it's kind of creepy how common they are.
This weekend at a bbq in south philly I nearly knocked a man down excitedly screaming,"mullberries!!" while gesturing towards the good Dr. to come look.
I was surprised to see several trees waving back at me with serrated fingers from an adjacent empty lot.
The good Dr. simply smiled sweetly and took another swig of his stout.
He's used to me by now.

Photobucket
...the mullberry bush...

Before we start some advice:

  • Don't get sick!
    Before you call up your instinctual hunter-gatherer and get picking , become aquainted with your tree.
    There are over 150 species of mulberry.
    Not all are suitable for picking and only the ripe fruits are edible.
    The unripe fruits , sap and several others parts of some trees are poisonous causing stomach upset and hallucinations.
    If you do not know what type of tree you are collecting from or are uncertain that it is safe to use the fruit you collect , DON'T DO IT.
    In addition to the above warning be sure the trees you are picking from have not been sprayed with pesticides or been given the opportunity to absorb nasty toxins from road sides or airplane dropping's
    (i.e. gyspy moth spray).
    Don't let this scare you though.
    White mulberry (white mulberry being a seperate species, we are not talking about the unripe fruit) has been used in Chineese medicine for centuries against fever.
    It lowers cholesterol and protects the liver.
    Mulberries of many species are also an excellent food stock.
    They have a fair amount of vitamins C and K with the added benefit of containing health promoting antioxidants called anthocyanin's.

  • Pick responsibly.
    One of the things that make tree's like mulberry so awesome is that they invite wildlife back into our living spaces.
    Birds, butterflies and animals of all sorts rely on these tree's for nourishment.
    Don't go hogging all the food.
    Animal's don't have freezers or supermarkets.

    Try to only pick 1/4 or less of what you see.

  • Keep in mind that many wild plants don't fruit with the same predictability as their domesticated cousins who have been bred over generations to exhibit characteristics humans find usefull.
    If your tree is only giving a little fruit at a time,
    save what you collect in the frigidaire for a few days or freeze it.
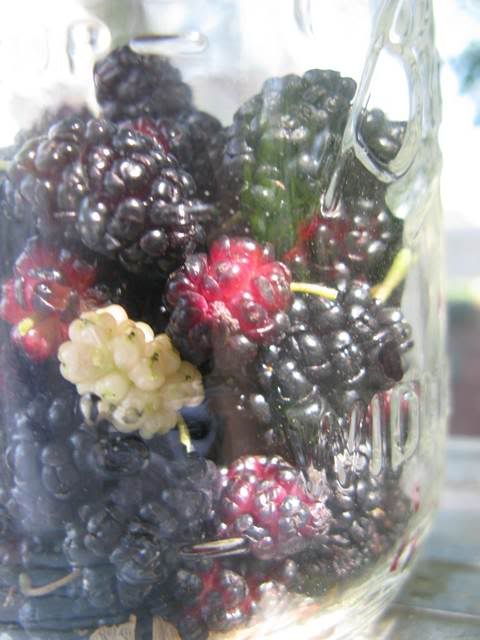
    Fill a mason jar with what you've got and cover it in a simple syrup of one part sugar to three parts water and freeze.
    The syrup keeps the fruit from getting gross in the freezer.

    Mulberries also mix imperceptibly with blackberries and go great with an equal measure of blueberries if you come up a little short.

  • Mulberries are like that athletic kid in gym class who is just dying to be picked.
    They fall right off the branch into your waiting hands, a jar or the ground.
    While picking berries don't be afraid to pick up the ones on the ground.
    Not only will they be washed, but they are also being cooked and sterilized.
    If you don't have a ladder feel free to capitalize on their eagerness to be picked and shake a few branches to encourage them to fall.

  • Making jam is not difficult but there is a bit of science involved.
    Im not going to get all "Bill Nye the sciecne guy on it" on it , but...
    Sugar, an acid (here lemon juice) and pectin all combine to make the jam "set."
    This is the difference between a syrup and what makes a jam jamy.
    If you will a jamy jam.
    Some fruits are endowed with more pectin and therefore more forgiving of sloppy proportions , but mulberries can hold a little bit of a grudge.
    Aparently when God was giving out pectin he kind of short changed the mullberry.
    (what a rascal!)


Photobucket
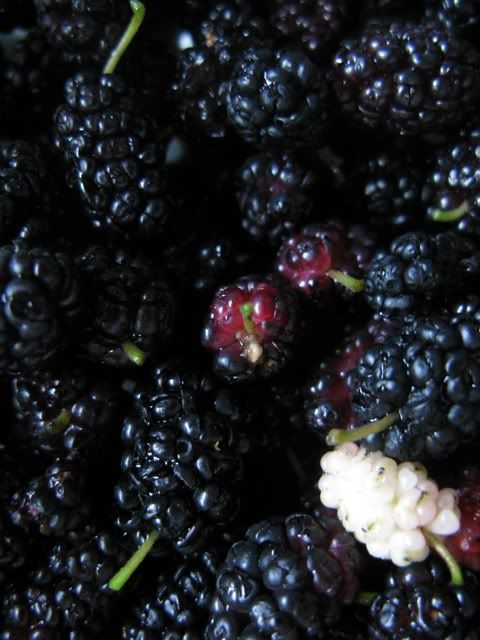
The darker the berry ... the sweeter the juice!


There are several ways to attack this problem :

- adding a high pectin fruit / or high pectin jam in with the mulberries
(i.e. apple/applejam)
- adding in a packet of commercial pectin (i.e. "sure-jel.")
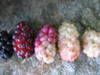
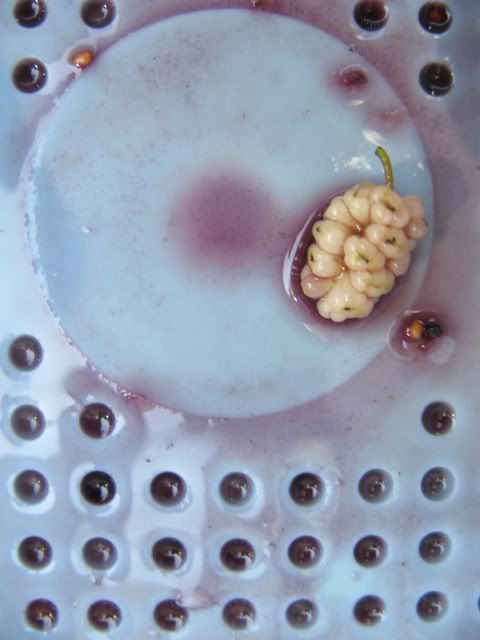
- or go au natural. Collect 20%-30% less ripe-red berries.
(i.e. for every ten collect 2 or 3 red berries. The less ripe berries hold more pectin).
Avoid unripe fruit as it has proven to be poisionous.
In the lovely image of the mulberry spectrum you see above, I would only use the two on the left - the purple and the red. To be safe avoid berries with an white spots.

Personally I collect red berries and also add in some commercial pectin for good measure.

Photobucket
...the mulberry bush...

Mulberry Jam

  • 3 cups mulberries
  • 1 3/4 c - 3 c cup sugar depending on sweetness of fruit.
  • juice of one lemon
  • one packett of sure-jel


Hot Pack Canning: A Rough Sketch

Canning is a simple process of cooking fruit, pouring it in jars and then boiling it in a big pot of water. The boiling water simultaneously seals the jar and kills any unwanted bacteria, mold or yeast.

We are going to approach making jam by setting up two stations.
The first will be your stemming station where you prepare the fruit for cooking.
This is best on a kitchen table or somewhere you can sit down and stem/pit/peel fruit which could take a minute or two.

The second is your canning sation.
This one should be set up next to your range or really close in proximity.
This is where you get to use all your dern-fangled canning equipment.
I think it's easier , and best, to just go out and spring for some equipment if you can't borrow it or already own it.
Ball and several other canning companies make "canning kits."
These come in two varieties.
The bigger one that costs bigger money and and the little one that costs littler money.
The bigger kit generally runs about 40 dollars.
It includes a giant pot with an adjustable wire rack .
The rack lifts your precious jars of sweet and sticky just enough to keep their cute little tooshies from scorching on the hot pot bottom.
It also has the same stuff as the small kit.

The smaller one cost's about 12 bucks.
It has several pieces in it - the most important of which are the jar grabber and a magical magnetic "wand" for picking up hot lids.
Both are designed to keep you from burning your precious digits and well worth the the peseta's.
Many of these kits also include a funnel to fit in the mouth of your jars and a ruler to be sure your jam sits within a 1/4 of the jars lid.
Check out amazon.com to check out products /prices / reviews before you buy.

You could always get creative and use a stock pot for the canning bath, replace a pair of tongs for the jar grabber, and a fork for the magnetic wand, but these things are going to get HOT.
Go buy some new toys.

You will also need a second non-reactive pot to boil the fruit/sugar/pectin/lemon juice in. A non-reactive pot generally means someting other than aluminum.
Aluminum readily reacts with acids and jam making utilizes acids to make the jam gel.

You may also want a ladel to transfer the hot jam from pot to jars.


The Process

Fill your canning vessel with enough water to cover the jars up to an inch and a half (roughly one thumb length from the joint that meets your hand to the finger nail) and place it on the stove to boil.
This will create your canning bath. Think of it as a big hot jaccuzzi for your cute little mason jars.
The pot can get pretty heavy so feel free to fill it a little , then transfer water from the sink to the canning bath with a smaller more manageable pot.

Unscrew the mason jars and seperate the two part lid from the jar.
Place the screw top on the counter at your canning station, put the lids in a small pot of water you will simmer for the duration of the canning process, and sink the jars in the canning bath.

If you look at the bottom of the discus piece of the two part lid, you will see it is ringed in a rubberish band. When placed on top of the mason jar this is what seals your jar up nice and cozy so that no bacteria or mold can get into your jam.
Simmering the lids brings them up to the temperature of the red hot jars coming out of the canning bath and facilitates a proper seal.
There are a few times I have canned on the quick and forgotten to simmer the lids.
I am not advising you to skip this step, but they did seal.
Keep in mind that once the discus piece of the two part lid has been boiled it should not be used again.
However, the screw top lid can be used several times over provided it doesn't have any dents and fits a jar tightly.
Boxes of 12 new discus lids are packaged seperately and sold on their own.
Buying a box will enable you to reuse your screw tops and glassware.
How green!

If you are cooking without a commercial pectin , stick a small juice glass or ceramic plate in the freezer. I will explain this below.

Wash the fruit and then set up your "stemming" station.
This stemming station consits of nothing more then two bowls , a pairing knife and a paper towel.
In one bowl you will sit the freshly cleaned berries/fruit.
You want to de-stem each piece of fruit.
The stems actually run pretty deep in these bad boys and you will want to sort of dig down in them to get as much as you can.
A few left behind won't hurt anyone, but the stems cook differently then the soft drups around them. Too many may add a few "twiggy" spots to your jam.

After digging out the stems place the berries in the second bowl.
Be warned that the berries kind of fall apart when you take the stem out.
This is perfectly ok.
In a lot of jam recipes your asked to crush the fruit to get more of the juice out. Lucky for us stemming mulberries sort of collapses the fruit releasing juice in the process.

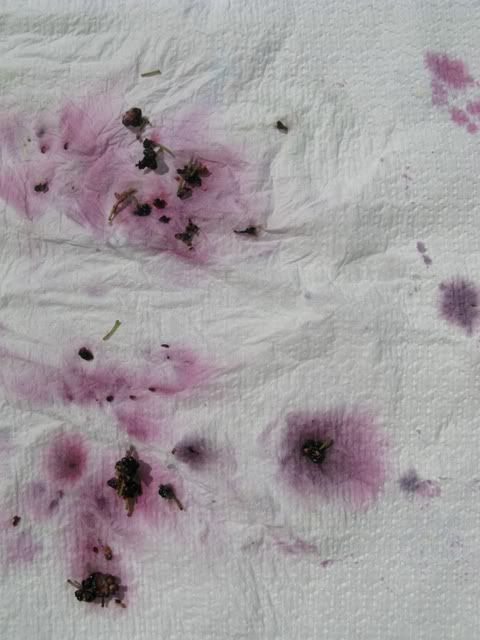
These little guys can get some distance - shooting juice clear across the room.
If you look carefully you will see them eyeing up your crew necks.
Do not wear a white shirt unless you hate it!

Stemming could take you a little time maybe depending on how much mulberry you've got.

Photobucket
...here we go round the mulberry bush so early in the morning...

Once you have completed stemming the fruit, coat it with the lemon juice and then toss with the sugar.
Keep in mind lemon seeds can make jam bitter.
Be sure to pick them out.

At this point it's ready to go on the stove, but I usually throw in an extra step if im not in a rush.

I let the fruit rest.

I cover it with cling wrap and place it in the frigidaire anywhere from overnight up to a day.
This is the old school way.
In my experience it gives the acid, pectin and sugar some time to get acquainted with one another, ultimately drawing out more juice and adding up to an overall better texture.
It might just be me,but jams prepared this way seem to be more on the goopy spreadable smell great side and less on the plasticy jello-like aspic side.

Next, wether it has rested overnight or comes straight from your stem station,
place the fruit,sugar and lemon juice mixture in a pot on low heat and stir constantly until it has all been incorporated into a seemless syrup.

After some time you will see that pinkish foam starting to appear on its surface.
It's nothing weird like rabbies or anything.
Just bubbles.
You can choose to leave it be as I do or skim it off the top with a spoon.
I also know people who add in a tbl of butter to cut down the foam.
I am a little wary of this as I am unsure of how fats would breakdown over time in a jar , but grandmas have been doing it for years.
Play at your own risk.

Keep stirring and heating the syrup until boiling bubbles form that you can not stir away.
When you have reached this stage it is called a "hard boil."
Its not necessary to use, but if you have a candy thermometer it should be registering around 220 degrees farenheit.

Add in your sure-jell and stir until it is fully incorporated.
Sure-jel is a preparation of powdered pectin that will ensure your jam will gel.
Get it?
Suuure-jel?! (*nerdy snort laugh*).
It is available in the hardware section of most grocery stores oftehn right next to the mason jars.
Jam can be made without it , but generally needs to be cooked longer.
This longer cooking time can make the fruit rubbery and tasteless.
Add in and extra 5 - 10 minutes of boiling in the canning bath to sterilize teh jars and you come up with a pretty lifeless jam.

The first indicater that your syrup is jamming is the hard boil.
The second is the plate test.
Remember that piece of dinnerware in the freezer?
This is it's cue.
You can trust a commecial pectin to set your jam without a test.
However if you are adding in apple jam or counting on the natural pectin in a fruit to make the jam set you will want to take the plate out and put a dab of jam on it. Return the plate back to its icy apartment in the freezer and check back in a minute or so. When the plated jam sets up the way you like it is done.
Again when using a commercial pectin this step isn't really necessary but it is fun to see how "done" it is.

It should be mentioned that one issue with commercial pectin is that it breaks down fairly quickly at high temperatures.
If you read the insert that comes with your Sure-Jell packett will suggest that you boil it for one minute only.
To gaugae a full minute I usually count to sixty slowly (a doi Ralph),
or sing a short song the duration of one minute.
As it is getting closer to the fourth of July lets go with the national anthem.
That's the one that starts, "Oh say can you see..."
Once you hit , "...and the home of the brave..." cut the heat and move the pot to a cool burner.

Now we move to the canning station.
Retrieve a jar from the now boiling canning bath.
Ladel the hot jam into a warm sterilized jar, top with a lid disk from the simmering pot and then use an oven mitt to screw on the second part of the lid.
(this is a good place to use your fancy equipment like the funnel and the magical magnetic "wand.")

Place each jar in the water bath one by one directly after it's lid is screwed on. You want to minimize its time out of the bath.
Don't let the baby get cold.

Let it hang out in there 5-10 minutes.
When removing the jars try to go in sequential order, taking out the first jar you placed in until you pick up the last.
Try not to bang the jars around too much and don't touch their tops for a while.
As they cool down, a vaccum begins to form within the jar which will seal it from the outside.
Over the next hour or so you will hear little tin-y popping noises that indicate your jars have sealed.

To check if a jar as sealed properly , press gently on the lid after it has completely cooled.
If it flexes it has not properly sealed.
In this case refrigerate it immediately and use it up asap, or just toss it.
It is possible to save it by re-processing it , but at this point I have no experience with that.
I am sure you could hunt down instructions on the interweb.
If anyone tries it let me know how it goes.

Jars that have sealed can be used up to a after they have been sealed.
Date them to be sure no one gets ill.

here is a great website to check out.
Not only is there a butt load of recipes and general information on canning , but you can also type in your zip code to get a list of farms in your area where you can pick your own fruit.

http://www.pickyourown.org/

There are also several other web sites available on the internets many sponspered by canning companies like Ball.

Photobucket
P.s. "Here we go round the mulberry bush" was first sung by felmale inmates of a British prison.
See the disclaimer below and don't sue me or try to put me there.
If you want to use it as your "minute song" I would suggest singing four verses.


*Disclaimer: I am not a professional and cannot be held accountable for any type of poisioning based on the recommendations I have made above wether due to picking bad fruit or bad canning technique. Or anything else for that manner.s
Do your own research on what you have available to you before jumping in to this or any other recipe.
If you are unsure if something will make you sick, don't eat it.
Can at your own risk.

Thursday, June 12, 2008

I'm Obsessed: Grilled Cheese with Vidalia and Granny Smith Apples

Photobucket
It put's the Uuuuunnnn in Lunch

Im not ashamed , but I will apologize.
It's a general good rule of thumb that if you can make a recipe just by reading the title of the post , as Dr. Phil would say, It ain't no recipe.
So lets just call this a list.


  • Swiss cheese
  • Chedar so sharp it cuts itself
  • Thinly sliced granny smith
  • Vidalia onion.
  • Olive oil or butter to fry it up in


Sometimes the simplest things are the most deliscious.

Monday, June 9, 2008

Cheesy Baked Chard with Vidalia Onions

Photobucket
Swiss Chaarddd me matey. Pre-bake.

Is it just me, or do some words in the English language just BEG to be spoken with a pirate accent?
Say it with me!
Swiss Chaaaarghdt.

I am always on the lookout for palatable ways to incorporate leafy green vegetables into my diet, and this little gem has made its way into my oven twice in the past week alone. I started out with a simple recipe for gratineed Swiss chard from "Eating by Color" by Williams-Sonoma , but one thing lead to another and before I knew it I had dressed it up in my love.
My love being Vidalia onions ,Parmesan cheese,nutmeg and pepper flakes.
mmm.

You could of course use a different type of onion.
Vidalias are a sweet onion owing thier flavor to a good southern upbringing in a specific region of Georgia with soil low in sulphur.
With its coy demeanor, and southern charm a good Vidalia can keep a potentially bitter chard in check.
After purchasing a box last week I have been scarfing them up like they are going out of style. And
at the rate things are going, they just might be.

This recipe makes a tasty side dish or toss it with olive oil and pasta for a Delicious and healthy main.


Cheesy Swiss Chard with Vidalia Onions


  • 1 bunch Swiss chard
  • 1 large onion Vidalia or otherwise
  • 1 large clove garlic (or two small)
  • small hand full of red pepper flakes (roughly 1/2 tbl)
  • 1/2 cup-ish parm cheesy
  • pinch nutmeg (roughly 1 tsp)
  • 1 cap full of apple cider vinegar
  • 1 tbl olive oil (to taste)
  • butter (to taste)


*one small baking dish. (I used a nine inch oval. A bigger one will do but, as it will leave a thinner layer of chard be sure to reduce the baking time.


Be sure to rinse the chard thoroughly.

Chop the chard horizontally discarding the thick red stems.
Steam the chard with a few inches of water in the bottom of a pot until it wilts
and then drain off the water.
This will make it a little less bitter.

In the meantime, saute the onion and garlic.

Sprinkle with the apple cider vinegar and pinch or two of nutmeg.
Toss with olive oil then the parm and pepper flakes.
Salt ad pepper.
Add some more cheese on top and dot with a few slices of butter.
I also like to stuff the corners of the baking dish with extra parm in order to get a nice parm crust.

Bake in a 350 F oven for about 10 minutes till cheese has melted and the top is lightly browned.

eat em up yum yum.

Monday, June 2, 2008

China Dina

Photobucket

Chung Sing Restaurant
210 E Lancaster Ave
Ardmore, PA 19003
(610) 649-8115
(click on the link above for a citysearch review and a complete pic.s)

So the truth is I am not the most qualified person to write this review as I'm not one of those die hard Chinese take out comfort queens.
After a bad day I want ice cream and a bed.
If I don't feel like cooking I get chicken parm or falafel.
To me chinese food is Chinese food.
Don't get me wrong, I can get down with the real deal.
I also love me some hot and sour soup almost as much as frying up an egg with left over pork-fried rice for breakfast.
Yet when it comes to the whole take-out thing I am more of a back seat eater.
But Chung Sing isn't just chinese food.
It is Chinese food in an amended diner.
A shiny , oddly seductive , self-entitled glam pagoda.
It sits across from a car dealership throwing sunshine like rotten eggs into the reflective windshields of brand new lexus's like a mischeif night hoodlum.
It's entirely bizare and as such doubly enticing.
When I first saw it I couldn't help but salivate.

I wanted an egg roll.

Photobucket

I probably don't need to remind you of my love for diners, so it should come as no surprise to you that I petitioned the Dr. Admiral to pull over and investigate with me. What with its precious stone like roof , red neon signage, paper lanterns and old school chrome diner get-up how could you feel anything less then charmed.
It's easy to overlook the broken tile bathroom and general brown/neglected feel. Chung Sing is magical.
It's aethstetic is at once mildly disconcerting and undeniably familiar.
Chinese restaurants are a dime a dozen, but Chung Sing offers something none of the others even come close to.
Unparalleled atmosphere.
As a troubled half breed, Chung's offers a peculiarity deserving of your after noon snack support.

The meals were cheap, and somewhat inventive ,collecting the creative better parts of mailbox menu's , though hardly deviating from what you would expect.

Everything on the menu can be made with a vegetarian "meat," which looked homemade and spongey. All the better to soak up deliscious sauces.

The service was quick and kind which leads me wondering hwere the bullet hole in the window came from.
Not that its the first Chineese Restaurant I've been to with a bullet hole in teh window
(um ... I will thank some of my brooklyn crew to think back to a brown bag night night with a 40 and a 4 top in Fort Greene)

On to the food:

Photobucket
I got my roll.

A good egg roll can be like an unexpected back rub;
A bad one, on par with being stood up at the alter.
Chung's egg rolls were crispy without being oily.
Craving settled.

Photobucket

Foods featured clockwise from the rice:
Rice (a doi Ralph...) , cashew chicken, pork fried rice, lychee duck , noodles and pickled veggies.

Photobucket

Dr. Admiral ordered the cashew chicken.
It was good.
It had both cashews and chicken in it.
This might sound dumb to say ,and I don't mean to offend any Chinese food store owners, but If I had a quarter for every time I asked, "is this really chicken?" with a barely discernible mass somewhat resembling meat dangling form my fork I'd have a whole lotta won ton if you know what I mean.
And if you don't I mean quarters.
With cashews for miles and beautifully cooked chicken I was forced into pointing away form the table and shouting , "LOOK!" just to break the the good Dr.'s concentration long enough to steal a fork full from his plate.
yeah.
I'm sneaky like that.

Photobucket

I really went out on a limb with the lychee duck ( ala Shirley Mclain).
Well, the limb broke.
It was simply unable to support the weight of my heavy expectations.
I love love love lychee, but the "sauce" it made was far too sweet, and way to viscous. Clearly made from a can, and
Impervious to any attempts I made to wipe it off the veggies.
It engulfed them , rendering them limp and lifeless next to the duck fowl on my plate like exxon valdez victims.
That brings in the second problem.
The duck.
It was uber fatty, gray and had a weird skin.

Photobucket

In short , Chung chicken is kickn'.
Chung duck fowl..is ...well...foul.

I would definately check this place out , if only to go inside.

Thursday, May 22, 2008

Cannoli French Toast with Chocolate Chip Challah

Photobucket
Challah back!

This recipe is my Ode to my home state.
If you don't know, New Jersey is home to many things, but diners and Italians are at the top of the list.

If you have ever had the pleasure of eating French toast in a jersey diner you know it can be just like sugar coated crack.
The bread is cut into monster yellow-gold bricks that would set Dorothy Gale off on a whole new trip.
Digging your fork into a piece you find that they fall apart like cotton candy; melting slowly and sweetly.
Billowy clouds that soak up syrup like a sponge, then release it in a satisfying bolt, stroking your blood sugar till you’re purring like a cat.

The perfect Sunday morning pick me up.

And any jersey Dego worth his weight in gold chains knows that good French toast starts with days old crusted up challah bread.
Like a good Italian boy you need a bread that is soft enough to love his Mama, but tough enough to give you a tooth ache - its got to be able to stand up to an oil slick of butter and syrup.
And, of course, just like and Italian boy, big where it counts.
When you’re slicing up your bread remember to cut it big and thick.

Stuffing a few slices with cannoli filling is like a dream come true.
Not too sweet, it's the perfect foil to the crusty texture of the French toast.
I feel like making good cannoli cream is just one of those funny things you get a feel for over several attempts.
However I included a jumping off place if you have never made one before.
It was gleaned from a drunken conversation with a cannoli obsessed uncle I met at a wedding.
This same uncle (who will go nameless) was seen later collecting "extra" packets of Jordan almonds off of neighboring tables at the reception.
You know, the pastel/silver coated kind your Nona keeps in her china closet for decades on end.
Those sugared almonds are no joke and most Italians I know take them more seriously than an edict from the Pope.
I would insult someone’s mother before I'd even glance at their almonds-
it’s a death wish.
Any man willing to risk his life over a few extra Jordan almonds must have a serious sweet's addiction. That sort of thing bodes well for a confectionary conversation , and when he starting eyeing up my nuts I got him talking.
When a man like that slurs out a cannoli recipe, you grab a cocktail napkin and start writing.

I cut the ricotta with a little cream cheese for breakfast.
The challah recipe comes by way of recipe zaar.
Not exactly diner bread but delicious.
It cranks out two loaves and judging by my families overwhelming response (There was only one left come mornings light), it wouldn’t hurt to make both.
Just be sure to knead the hell out of it.
I didn’t the first time and while it wasn't tough it wasn't quite as light as I was hoping.
I also dusted some brown sugar on top with the second egg wash.


Photobucket

first the bread:

Chocolate Chip Challah Bread
By Ariella. Reprinted from RecipeZaar

  • 10 g dry yeast (approximately 1.5 packages)
  • 1 tablespoon sugar
  • 1/2 cup sugar
  • 1 3/4 cups warm water
  • 1/2 cup vegetable oil
  • 5 large egg
  • 1 tablespoon salt
  • 8 cups all-purpose flour
  • 1/2 cup semi-sweet chocolate chips.(i used s mix of milk and dark)


In a large bowl, dissolve the yeast and 1 Tablespoon of sugar in the water. Whisk until completely combined.

Add vegetable oil and whisk. Then add 4 of the eggs, whisking for about one minute after each egg is added. Whisk in remaining sugar and salt. Add flour one cup at a time, mixing with a sturdy spoon after each cup.

When all of the flour has been added, turn dough onto floured surface and knead the dough to remove all lumps. Clean out bowl and grease it. Form dough into a ball and return it to the bowl. Let dough rise for one hour in a warm. The dough should approximately double in size. Punch it down and then put chocolate chips in center of dough and reform dough into a ball so that the chocolate chips are encased in the center of the dough. Allow to rise for another 30 minutes.

Remove dough from warm spot and place dough ball onto floured surface. Using a long serated knife, cut the dough in half and then cut each halve into thirds. Reform all six dough balls so that the chocolate is encased in the center of each ball. Then, using your hands, roll out each ball into a strand approximately 15 inches in length. Take three strands and pinch them together at one end, tucking the pinched ends under the bread. Braid the three strands together. When you get to the end of the strands, pinch the strands together and tuck under loaf. Repeat for remaining three strands to create a second loaf.

Lightly grease a large baking sheet. Gently transfer the challahs to the baking sheet. Whisk remaining egg in a small bowl and brush generously onto each challah. Return loafs to warm spot to rise for another 30 minutes. (this is where I sprinkled on the brown sugar)

Preheat oven to 375. Brush challahs with second round of egg wash. Be sure to get egg wash into all the cracks and crevices. Place loaves into oven on middle rack. Fill a baking dish or roasting pan with about two inches of water. Place dish on the rack below the challahs. Bake the challahs for thirty minutes, rotating the baking sheet once in the middle of baking time. Challahs should have a medium golden brown crust and sound hollow when tapped. Be sure to check challahs near end of baking time in order to avoid over cooking. Continue cooking past 30 minutes if challahs aren't golden brown yet.

Cool challahs completely on wire baking rack.

Below are a few bread making tips:

Photobucket
You catch more flys with honey...

* Make sure your yeast isn't wicked old. You want this bad boy to rise and tired yeast is'nt going to get it.

* A warm spot does not mean the top of your frigidaire or ,God bless, standing over an open bowl with a hair dryer. Place it on the stove top while the oven is preheating or out in the sun. I also place a wet/ damp paper towel over the top of rising bread to keep it from drying out. or getting any bugs/debris in it. As you can see from teh abov epicture there is nothing you can do if its out in the open.

* I would also suggest baking on a pizza stone if you have one, or undercooking it by a few minute sto avoid burning the bottom.

* I didnt really get the cutting instructions. I mean, I did it but it didn't make sense to me entirely because when yopu keep placing all teh chocolate chips in teh middle , only the middle of each bread, and subsequently the middle of each loaf has all the chips. There is no reason why you can't distribute a few in teh outer edges of the bread by pressing them in in order to avoid this problem.

* Wetting your fingertips makes them dough glue sticks. Rub them along the tips of each rolled out dough braid before mossing them together and they will adhere to on another a little better.

* Your boyfriend or girl friend may hate it, but this is one place its ok to BE KNEADY! knock that dough around for at least 7 minutes. A standing mixer helps with this but there is nothing quite as satisfying as adding in a little elbow grease.
This is a place to get butch.
Ruff.

Photobucket
The bread maker bread.

Alternately,

the first time I experimented with this was using the Dr. Admiral's bread machine. I have judged bread machines harshly in the past, snickering at wedding parties and calling friends homo's. But , as teh slow cooker of the bread world, it really does cut down your work load. It is always nice to wake up early inth emorning and do all of these steps while your multitasking with laundry and paying bills. But a bread maker cuts your chain and your free.
I just added some chocolate chips to the "add ins" phase of a regular challad bread recipe.
The only bummer is that they mostly fell to the bottom , but having a crust filled with chocolate is never a bad thing.


Cannoli filling

The original recipe handed down to me was i part sugar to 2 parts ricotta. Cannoli can have a lot of personality depending on what region the recipe comes from. I added a cap full of vanilla and substituted some cream cheese to make it a little more breakfasty. If your after something more traditional, leave out the cream cheese and put the same amount of ricotta back in. Add in a little citron , pistachios, maraschino cherries or a pinch of coco powder / cinnamon.
As for my personal cannoli recipe? Im not giving it up.


  • 1 1/2 C plus a little extra dry ricotta
  • 1/4 - 1/2 C cream cheese
  • 1 cup powdered sugar
  • 1/2 cup mini chocolate chips
  • capfull vanilla extract or about 1/2 a vanilla bean's innards


The trick here is to make sure your ricotta is DRY. If its very wet, wrap it in cheese cloth (or a coffee filter) and stick in in the fridge suspended over a bowl over night. The filter/fabric will absorb and express some of the liquid.

When you are ready, beat the ricott and cream cheese together with the vanilla, adding the powdered after the two "cheeses" are well combined.
Here comes the most important part.
Taste it.
Add more sugar if you want.
Then dump in the chocolate chips and any add ins.
If you cant find the mini chips , run of teh mill baking chisp will do or you can grate , beat or chop them into little bits.

Putting it together: French Toast

It may seem sort of pretentious / presumptious to tell you how to make French toast, but I just had a mystified friend (one of my intelligencia mind you) ask last week.
There is no shame in that.
So, just in case...

  • 1 egg beaten
  • pinches of both cinnamon and nutmeg
  • splash of milk / cream * optional


Beat the egg. Add in the milk if your using it along with the spices.
I usually do this right in a bowl , and then drop the sliced bread in.
I let it sit on each side for a minute to be sure it absorbs the egg mix and is super duper coated. I usually fry them two by two - allowing pairs to hang out in the egg bowl while frying up two others.
Generally I don't add the milk to keep the bread away from teh soggy side but it does help carrry the spices.
Alls you've gots ta do is fry the eggy pieces in a pan with some butter on each side till perfectly browned and then add the filling.

The lazy way: spread with the cannoli filling like a sandwhich.

The not as lazy way messy way: cut slices in the bread to make them into little pockets. Fill with cannoli and fry.

The not as lazy and not messy way / aka the best way:
Slice the bread on its lateral side after frying and stuff with the cannoli filling.

Tuesday, April 22, 2008

Lamb burgers with zucchini fries

Photobucket
Bar-B-Qewe.

The weather here in the Delaware Valley is just starting to curve up, ever so slightly.
The gorgeous first blooms I have been obsessively photographing the past few weeks ,powder pink and absurdly pretty, have been abducted nightly by some unseen hand - turning up like missing persons strewn across the ground each morning.
Dawn breaks and the reluctant rush of a mid week morning begins.
Each day a few more flowers are gone and I look to find fresh , bright green leaves waving good moring in place of dethroned pink.

With summer just around the corner I have been biting at the bit for BBQ season.
But, why wait?
So , here it is. Spring Bar-B-Qewe.
I drew inspiration from the description of one of my all time favorite restaurants staples : Oznot's lamb burger with zaatar aioli and harissa.
This recipe ain't no Oznot's, but it is definitely a keeper.
I used fresh zaatar-ish herbs
(which, proper and dried would lend themselves to a kick ass rub)
placing them directly into the burger.
I also attempted to make the harissa into a BBQ like sauce.
I'm still working out the kinks on that one, but
serving them with straight up harissa and tsatsiki was Delicious.
I nearly chewed my own fingers.


Photobucket

For The Burger

  • 1.5 ib ground lamb
  • coriander (dried)
  • cumin (dried)
  • oregano
  • marjoram
  • cilantro
  • salt and pepper
  • 3 small garlic cloves
  • 1/2 large onion (I used yellow but red would give more kick)

* This burger would have been A-maaaazing with Chevre. Feta if your into it. Oznaut's used manchego. This time around I just a cut up baby bell.

Nothing could be more simple.
Saute the onion and garlic until just barely tinged golden.
mix with meat.
Then add in roughly one tbl coriander and one tbl cumin.
Chop up about a hand full of each of the other fresh herbs and mix it all together with your hands, forming the meat into flattened patties.
Grill , broil or fry until juices run clear and the cut open center of the burger reflects the desired well done-ness.
Be sure to cook thoroughly in order to avoid illness.

Photobucket

For The Zucchini Fries

  • two huge zucchini
  • paprika
  • pesto mix
  • garlic cloves to taste

You can, of course, add whatever spices you like and even cut in some parm cheese.
I would suggest dredging the zucchini in a little flour/ salt mix , or adding breadcrumbs to the herb mix in order to draw out some of the moisture and keep them from going entirely limp.
No one likes a limp zucchini.

Cut up the zucchini into 1/4 to 1/2 inch pieces.

Now you have got several ways to go:

method 1:
The easiest is to simple spread on a cookie sheet adn drizzle with olive oil . Then sprinkle with herbs and bake as below.
or
method 2:
Dredge with some salt and flour, enough to dust the zucchini pieces.
Let the zucchini sit like this for 15 minutes - 1/2 hour or so.
This step isn't entirely necessary but it does help keep the zucchini a little more on the dry side.
(This would be a good place to multi-task. While the zuchs are drying out - mix up the burger etc.- just be sure to wash your hands after handling raw meat.)

Fill a bowl with enough olive oil to coat all of the zucchini and mix it with the herbs.
Spread out evenly on a cookie sheet.
Bake in a super duper hot oven.
450 degrees for 15 minutes.
Try to flip them with tongs or a spatula about half way through.
or
method 3:
You can also mix equal parts parm cheese and bread crumbs, beat and egg and bread the zucchini by dipping it first into the egg, then into the parm/breadcrumb mix.
Afterward bake as above.

The method I used that yielded the best results was method 2.
It kept the zucchini little on the dry side and coating the slices entirely in oil made sure they were all evenly coated with the oil mixture.

sooo good.

Photobucket

Wednesday, April 9, 2008

Spring Garden

Photobucket
"Weed" may be the only four-letter word in the English language I don't use.

As a young collegiate lad, I decided to indulge my underfed bio nerdiness by supplementing my high falooten design degree with a certification in western herbalism at the New York Open Center under Peeka Trenkle.
Those classes fuelled a budding interest in food and health that ushered in a major change in the way I thought about food, and of course, how I ate.
Ever since I have been known to get a little witchy on occasion.
I'm not ashamed to dig up a root or two , and if you cough around me I'm going to try to dose you with garlic.
Enuf said.

So, this is the long way of saying I would like to introduce you to my Garden.
Garden, Reader. Reader Garden.
She may look a little toe-up now, but after she combs her hair its going to start getting green around here.
In addition to a few hot photos , you can expect gardening tips I have picked up along the way , as well as benefiting from my ethnobotanical knowledge (not that I am an expert or a medical professional or anything so respect my amatuerity and don't go suing me. Instead go to a doctor. p.s. that was the disclaimer).


"Weed" might be the only four letter word in the English I don't use,
as evidenced in the picture above I like to keep it on the wild side.
If strangers are friends you haven't met yet, then the same can be said for weeds.
They are nothing less then misunderstood plants, and learning to control your pruning finger can be a rich educational experience.
Gardens are , after all, one of the last places where we hold onto some part of our illicit past as hunter gatherers. Modern as we may feel ourselves to be, we often carry around plants as heirlooms- passed down to us like ancestral china.
We invite plants to sit on our windowsills and in our offices, pack them like over sized shirts into the grids of our cities and nurture them in our backyards.

But every garden has its outliers.
The wild has only been mildly domesticated.
In a feral garden there is always something new and once the growing season starts I'm always finding some interesting foreign leafy thing to look up.
Adding to the field book Que are butterflies , birds , assorted pollinators and the associated riff raff that follow them.
I actively try to recruit wildlife who appreciate the diversity and often reward me by popping in to "drop off" new seeds.
These are my gems.
Very often the very plants Ive been contemplating purchasing at the garden center actually turn up unannounced in the beds provided I give them a chance to grow.
I like the idea of a garden as constantly evolving with its own desires and personality.
While I make an effort to tidy up the beds I give it some room to breathe.
I'm on the liberal left when it comes to border patrol.
What can I say?
I like it a little hairy.

Welcome to my garden.

Photobucket

Friday, April 4, 2008

Ruby Red Grapefruit Granita with Rosewater and Honey

Photobucket


Grapefruits are like God's gift.
A ruby red grapefruit is one of the last bastions in adulthood where you are given silent permission to sweeten the hell out of something without being reprimanded.
Even if you are 65 and have diabetes no one will bat an eye as you sprinkle sugar all over your grapefruit half , spoon in one hand and insulin in the other.
With a breakfast like that who among us wouldn't feel blessed?

This was my first time making a granita and while I knew it would be super simple I had no idea how defeated I would feel afterward.
There was no " Holy crap I'm a culinary genius!" ego stroke to be found here folks.
But the sophisticated fancy pants points come in here with the name.
Say it out loud with me.

GRANITA!

Sometimes sparkly Italian words give you eat cred.
So cut that "water-ice" talk and let yourself feel superior.

Despite my opening sweetener rant , I went for the gold here and swapped out the sugar for some honey.
I have always wanted to keep bee's and have some really great jars from family friends in the Ukraine but opted for a reserve jar I bought straight from a keeper on a dirt road in Hawaii.
This is a great place for a flowery honey.
It compliments the gentle perfume of rosewater and softens the grapefruit into something pooling and breezy.

* I don't have my notes in front of me while I'm writing this but this is pretty darn close. I will check back with exactly what it is I did soon I promise.

Ruby Red Grapefruit Granita with Honey and Rosewater and Honey

  • One Grapefruit juiced with pulp included
  • one half cup water
  • 1/4 cup honey
  • 2 tbsp rosewater


Heat the water and honey until bubbles form.
Once cooled added the grapefruit juice and rosewater.
Mix well.
At this point you've got options.

1) Freeze in ice cube trays and blend up in a food processor.

2) Freeze in a plastic freezer bag.
Once frozen double bag and beat against the concrete / smash with a mallet.
Of course this is the method I prefer.
(just be careful. not only for the sake of your thumbs but for the sake of the bag. It may rip open.)

3) Freeze in a tray or container that will allow you to scrape it into flakes with a fork. This actually works pretty well.


Now eat it. Let it melt on your tongue and bring you one step closer to God.

Whoa image. It is. it's kind of ridiculous. and another citrus fruit.
Photobucket


Tuesday, March 18, 2008

Hot Sweet and Sour Glazed Shrimp

Photobucket
TaaDaaH!

While not entirely off my radar, I have never really loved a lot of heat in food. Something about the watering eyes/masochistic burning lips / killing taste buds thing has never made any sense to me.
It hurts.
But tastes change.
Where once I would wildly hunt the back of the Frigidaire for the salty sour of a crisp pickle, lately I've been hacking up and piecing together pepper parts like a Mad Dr.

Yes...
A Dr. pepper if you will.
Lets just say if bland is a disease, I've got the cure.

Here is a new role for that versatile out of work jam in your kitchen.
Serrano's punch up the sweet and sour of raspberry/currant/blood orange jam with roasted Pablanos yielding to a satisfying balance of heat and sweet.
It's also worth mentioning one of the greatest attributes of a mason jar glaze.
The jam sets up beautifully into a sticky high gloss that caramelizes like whoa.
This dish would be great on the BBQ with some grilled pineapple, or pan crackle it like I did.

Hot Sweet and Sour Glazed Shrimp

  • 1 lb Shrimp
  • 1 onion
  • 3 cloves garlic
  • 2 Serrano peppers
  • 1 Pablano pepper

For the Glaze

  • 2 tbsp jam (3 if you like it sweeter)
  • 1 1/4 cup pineapple juice (or substitute orange)
  • 2 tbsp vinegar
  • 1 lime juiced
  • 2/3 cup fresh cilantro
  • 3 tbsp cornstarch.


* optional*
salt, pepper, cumin powder....and fish stock for the rice if your into it.
Feel free to substitute the red currant rasberry blood orange jam from last post. I won't get my feelings hurt. Try raspberry,orange marmalade,guava, or even lime!
I did do you a favor though.
As far as the cornstarch goes more makes it thick and clingy, less more saucey.
Keep this in mind when deciding whether to grill or fry.
I kept the proportion of glaze to shrimp in a 1:1 ratio so that it is easy to multiply the ingredients by the number of pounds shrimp you intend to use. See...Daddy loves you.
Now get to work.

Clean the shrimp.

Mix juice and jam in a pot and bring to a simmer.
Now dump in the vinegar and let the mixture reduce a little, finally adding the cornstarch, stirring until it is fully incorporated without any lumps.
Turn off the heat.
The glaze will thicken while you stir it.
Mix in cilantro reserving some to sprinkle on top.
Leave the glaze on the stove top. Don't panic if its a little cloudy.

Dip the shrimp into the glaze or brush them several times over, and place on a sheet or dish.

Roast the Poblano and Serrano over an open flame, then chop them up with the onion and garlic. Watch the seeds. More seeds generally means more heat.
Saute the vegetables.

When the vegetables just begin to wilt add in the glazed shrimp and sprinkle with salt/pepper/cumin powder.
Cook on each side till sort of see through and pinkish - about 4 minutes depending on whether or not you bought them pre-cooked.

Serve it with a smile.
You did a great job!

Wednesday, March 12, 2008

Red Currant Jam with Blood Orange and Raspberries

Photobucket

In like a lion out like lamb.
March has paraded into town all vibrato and big hair this year which means we are currently under the paw of some serious lion days.
Tangled in its mane, the wind is thick and the sky alternates between slate gray and a gorgeous airbrushed blue.
Airbrushed. Like the Jersey shore. "I love Nino" with palm trees on the back of a boardwalk T-shirt.
Kind of makes you want to bust open your kaboodle, tie in your favorite scrunchy and make out on the Ferris wheel doesn't it?
(OK maybe those are just my airbrush associations...
Or just a shout out to my sister).

Anyway , don't get fooled by the jam recipe.
I'm not one of those people anxiously awaiting summer even after a trip last week to visit family in Florida.
This is one of my favorite times of year.
Bulbs are peeking out to see whats going on this side of the dirt divide and weird fruit starts showing up at my grocery store.
I have a habit of buying fruit and thinking about it later,which not only explains the crowded nation of pomelos confined to my crisper, but also the jam.
You can't let food go to waste and I can't help buying it.
Last week a hot little container of tart red currants rendered my mind zombified and my wallet parted open so wide that the cashier asked if my first name was Moses.

Raspberry and Red currants are old bedfellows, matched in color, sour factor and jam-ability. Blood orange lends its distinct color to an all together gorgeous sweet and sour jam.
"Yes," I hear you say.
"But What to do with a sweet and sour jam?"
I'm like a superdelegate for jam and maybe Im campaigning a little hard but
I believe it is underutilized.
I have an unexpected use for this one and I plan on posting it next week.

Red Currant Jam with Blood orange and Raspberries

  • 2 cups red currants
  • 2 cups raspberries
  • 3 blood oranges
  • 2 cups sugar

* note there is no need for added pectin

Boil the currants in just enough water to cover them for a few minutes to soften them.
Now mash em up.
Add in the raspberries and the blood oranges peeled and cut up into small pieces.
Boil until the jam begins to reduce and get jamy.
Pour into sterilized jars and process for about 7 minutes.

This makes about 3 1/2 pints.